Homebrewing Coffee – Part Two: Roasting
Welcome back to our series on homebrewing coffee.
Homebrew aficionados have long celebrated the art and science of crafting their own beer, wine, mead, cider, kombucha, tea, and a variety of other beverages. Each glass represents a personal journey of patience, precision, and passion. But there’s another familiar but often overlooked actor in this homebrewing story — coffee. Revered for its rich aroma and the morning ritual we experience and see every day, coffee is more than a daily beverage; it’s a cultural cornerstone. Across the United States, it’s as ubiquitous as it is diverse, reflecting the country’s multifaceted character in every order.
For homebrewers, the step into homebrewing coffee is a natural progression, an extension of our craft into new yet familiar territory. It’s an exploration of an otherwise mundane daily ritual through the lens of a craftsman, understanding the beans, the roast, the grind, and the brew, each a variable in the equation of flavor. This journey into coffee brewing is not just about mastering another beverage; it’s about enriching the craft of homebrewing with one of our most universal and cherished beverages. Let’s wander into the world of homebrewing coffee and rediscover how this new player complements our community through the shared language of art and science.
In part one of this coffee series, we talked about harvesting, processing, and packaging the beans. In this second installment of our coffee series, we explore that exact process of turning green beans into the wide variety of aromas and flavors we all search for every day.
The Science of Roasting
Roasting transforms green coffee beans into the aromatic beans we’re familiar with. Understanding this process is crucial for both producers and consumers:
- Drying Stage:
- Early stage where beans lose moisture and prepare for chemical reactions. Even drying is crucial to prevent uneven roast and flavor.
- Maillard Reactions:
- Like malting grains, maillard reactions are a series of chemical reactions between amino acids and reducing sugars that develop the complex flavors and aromas in coffee. Managing these reactions is key to developing the desired flavor profile.
- First Crack:
- A physical reaction where moisture inside the bean causes it to crack. This stage is often the division between light and medium roasts and is critical in defining the flavor profile.
- Second Crack (if applicable):
- Occurs in darker roasts and is characterized by a softer cracking sound. It indicates a darker roast, where the flavors of the roasting process become more pronounced than the original flavors of the bean.
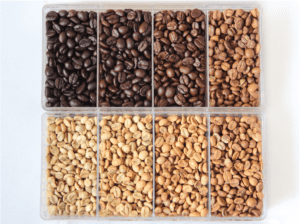
Roast Levels and Characteristics
Roast levels range from light to dark, each offering distinct taste profiles. The roasting time for coffee beans varies depending on the desired roast level and the specific characteristics of the beans. Here’s a general guideline for different roast levels:
- Light Roast:
- Time: Approximately 9 to 11 minutes.

- Characteristic: The beans are roasted until just before or right at the first crack. This preserves the original flavors of the bean, often resulting in a more acidic and complex profile.
- Time: Approximately 9 to 11 minutes.
- Medium Roast:
- Time: About 10 to 13 minutes.
- Characteristic: Roasting is stopped right after the first crack or just as the second crack begins. This level balances acidity, body, and the roast’s characteristic flavors, often resulting in a well-rounded profile.
- Dark Roast:
- Time: Around 12 to 15 minutes.
- Characteristic: Beans are roasted until the second crack or a bit longer. This results in a lower acidity level, a heavier body, and a more pronounced roasty flavor. Dark roast beans have a shiny, oily surface.
- Espresso Roast:
- Time: Typically 13 to 15 minutes, but can vary.
- Characteristic: Espresso roasts can range from medium to dark. The roast is typically stopped at the beginning or middle of the second crack. The goal is to achieve a rich, robust flavor suitable for espresso extraction.
It’s important to note that these times are approximate and can vary based on the type of roaster used, the bean’s origin, and the desired flavor profile. Roasting is as much an art as it is a science, and much of it comes down to personal preference and experimentation
Example of a Roasting Session
If you’re up for roasting your own coffee beans, here’s what that session might look like:
- Preparation:
- Select a batch of beans for a light roast.
- Preheat the roaster to around 200°C (392°F).
- Roasting:
- Introduce beans to the roaster.
- Observe the drying phase (beans turn yellowish and emit a grassy aroma).
- Watch for the First Crack (similar to popcorn popping).
- Stop the roast shortly after the First Crack to preserve the bean’s floral and fruity notes.
- Cooling and Storage:
- Rapidly cool the beans to stop the roasting process.
- Store in cool, air-tight container to preserve freshness.
Wrap It Up…
All homebrewers are pretty aware of the diversity of prepared ingredients that go into our recipes, eg sometimes Caramel 70 is just not the right substitute for Crystal 65. Coffee is no exception. There are so many varietals, so many terroir alternatives, so many bean preparations, so many roast methods and levels. I find it interesting that our beer community is keenly aware of many or most of the 122 beer styles, but we’re willing to just accept “medium” or “dark” or “espresso” for our coffee. I challenge all of us to go to the local grocery store and at least try another brand or another roast. I’ve been experimenting with different brands and can say that no two “bolds” are the same. I’m certain we can do better with our morning kick-off with just a little of the curiosity and experimentation we apply to our other homebrewed beverages. You can do it!
Here’s to a great day!